Regardless of the quality, sooner or later, almost all electric heaters begin to heat poorly, do not turn on, or no longer heat at all.
DIY repair installing an electric heater does not present any great difficulties, since this class of devices is often not considered a complex device.
In everyday life, people use a wide variety of electric electric heaters: electric infrared fireplaces, convectors, fan heaters and a variety of oil radiators. For all such devices, regardless of design features, the heating element is nichrome.
It should be noted that what simpler design heater, the longer such a device will work, and it will be easier for the husband to figure out the breakdown and repair it.
Device
For quick and effective repair First of all, you need to understand how the heater works.Regardless of the type of such devices, they all have basic common elements.
The heaters are equipped with one or two key switches with which you can select one or two heating elements that will heat, as well as lamps indicating the operation of the heating element.
The heating element may have not two contacts, but three, with two separated heating coils inside.
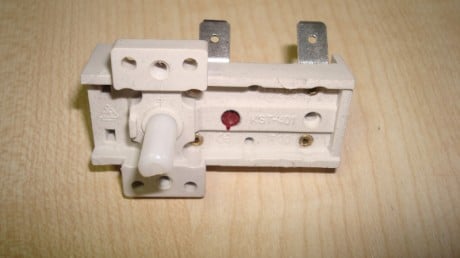
Immediately after the power cord and plug there may be a protective thermal fuse that will automatically turn off the heater after overheating, for example, if you cover the convector on top with a towel.
There may also be a tilt sensor that will work if, for example, the convector falls or overturns.
In addition to the thermal fuse, it may also be " circuit breaker" - overload current fuse, for other emergency situations.
schematic design of heaters
Diagnostics and troubleshooting of the heater
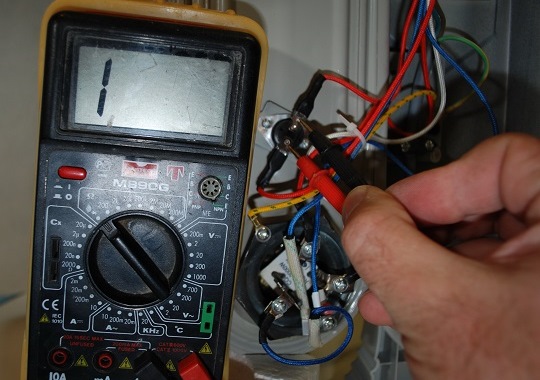
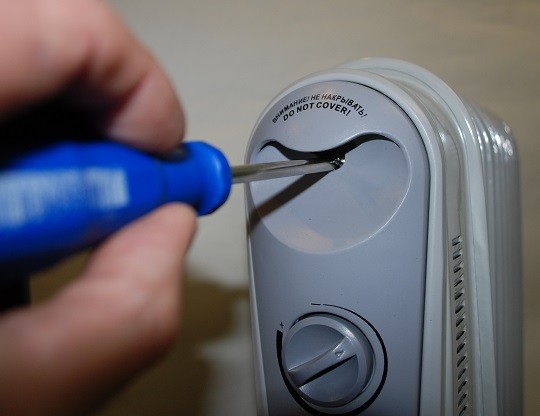
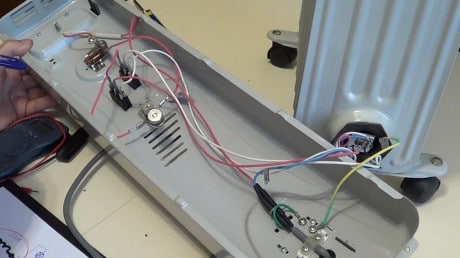
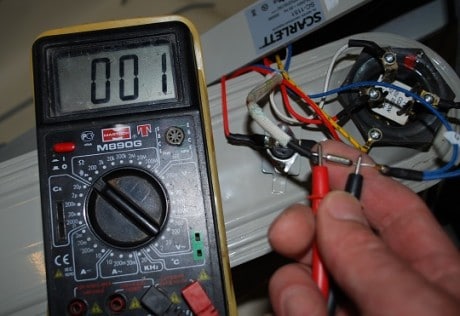
Any diagnosis begins with disassembling the heater, but before disassembling it, you must turn it off and pull the plug from the socket.We unscrew the screws of the housing, most likely the control panel housing. Having reached the connecting control panel with the thermostat, thermostat and other elements, we begin the test by testing the power cord.
Next, we check the operation of all control keys and toggle switches by ringing them with a tester. Then all serial circuits.
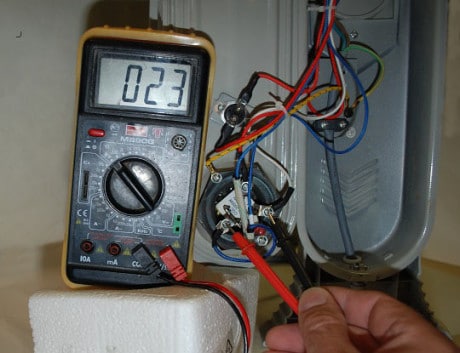
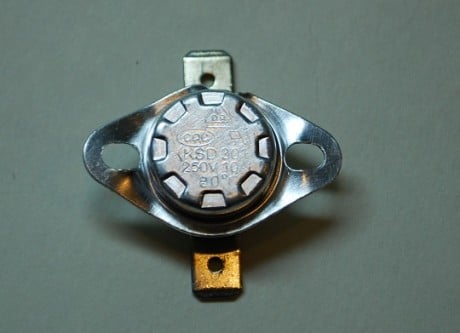
Thermostat is checked by a tester and it should show zero resistance (short circuit) or close to zero on the contacts, this will indicate the serviceability of the thermostat.
In addition to the serviceability of the heater elements themselves, the cause of the breakdown may also be poor and unreliable contact of the conductors; over time, due to differences in materials, they oxidize and rot, so at this moment you should also pay attention.
Then the protective elements are checked: position sensor and thermal fuse.
Thermal fuse they call the tester; in a serviceable and cold state, there should be zero resistance (short circuit) on its contacts.
There can be several such thermal fuses in one housing and, as a rule, the larger the housing, the more thermal fuses it contains.
It should be noted that the thermal fuse may be working (functional), but due to severe contamination of the filters and convection holes, they can immediately trip and turn off the heater.
What is it like? position sensor, so this, in most designs, is some kind of weight that, when the heater is tilted or dropped, acts on a mini switch that already opens the voltage. A working position sensor, in the normal vertical position of the heater, should have zero resistance (short circuit) on its contacts.
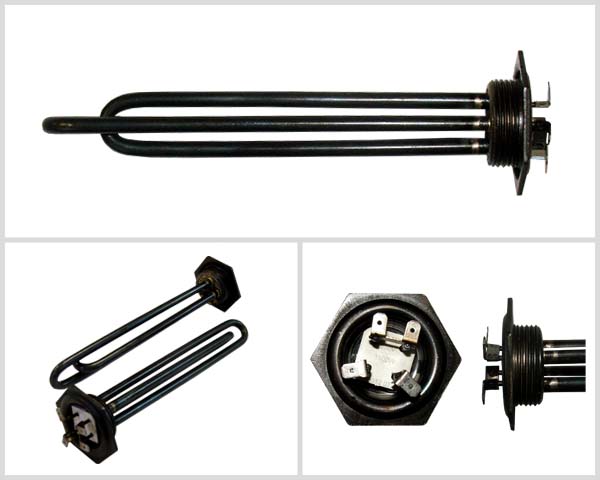
The main decisive point will be checking the heating heating element ov. In large heaters there are usually several of them, most often there are two. And often the reason for insufficient heating of the room is the failure of one of the heating elements.
In most cases, the heating element cannot be repaired and is replaced with a similar one.
How to check the heating element? The resistance at its contacts may vary, depending on the specific device, but it should definitely ring. Approximate resistance values can be in the range of 20 - 100 Ohms.

Main malfunctions of heaters
The heater does not turn on.
There may be several reasons. The socket, plug and electrical cord must be checked. Then disassemble and make sure there is mains voltage inside the device; it is best to use a 40W test light for this.
Check the voltage in the series circuit, thermal fuse, thermostat, thermal switch, heating element
Testing under voltage should be carried out carefully or use the resistance testing method (with a multimeter) without voltage.
The fan heater turns on but does not heat.
The heater blows air but does not heat it, this situation clearly indicates a malfunction of the heating element, one of the sections of the spiral may be damaged, it is necessary to carefully inspect the entire length of the nichrome conductor, and also ring the heating element itself with a tester, the resistance should be somewhere around 70 Ohms .
In the event of a visible break or burnout of the nichrome conductor, you can try to restore it by slightly pulling the broken conductors to the center and carefully twisting them together with a reserve, then securely inserting the “connection” back, but so that it does not move or close during operation randomly onto adjacent turns of the spiral.
Also, the reason for this operation may be a thermal fuse or bimetallic plates thermostat. In a cold state, they must be closed; sometimes it becomes necessary to strip them to improve the reliability of contact. Serviceable bimetallic plates should open from the heat of the soldering iron.
The fan heater heats up but the fan does not spin (does not blow).
If the blades are in good working order and are not wedged anywhere, then most likely the cause is the engines.
But still, first you need to make sure that there is voltage supplied to the engine. Make sure that its shaft rotates easily and effortlessly.
Next, you can check the engine with a multimeter; its contacts should ring and show at least some resistance.
If necessary, the motor can be disassembled and inspected inside, possibly heavy pollution. Ring the windings, clean the commutator unit and inspect the tightness of the brushes. It may be necessary to apply machine oil to the bushings of the moving part of the engine.
If the windings burn out, the motor must be replaced.
The heater turns off (due to overheating)
There may be several reasons. For example big square heating and low-power convector, as a result permanent job the case and internal elements overheat, including overheating protection elements that turn off the device.
In other cases, the cause may be improper installation of the convector. It is necessary to organize a free flow of incoming air to the lower part of the heater and a free outflow of hot air from the upper part of the convector; there is nothing to cover it with and not to create resistance to the release of heat from the convector.
The oil cooler is leaking.
Self-repair in such cases is a difficult and thankless task. Adhesives and sealants in in this case useless.
To seal the holes, it is necessary to drain the oil, fill with water and use inverter welding For thin sheets. Boil the hole, first clearing the area of paint and corrosion.
If oil is constantly leaking out, it should be understood that the oil will still need to be topped up, since for such a heater to work effectively, it is necessary to have 90% of the oil volume of the total capacity of the oil “tank”, the rest of the space should be occupied by air, it plays the role of a kind of cushion when the oil expands during heating
Oil electric heaters have simple design, so usually there are no special difficulties in their operation.
In most cases they fail, having worked for more than one warranty period.
However, even the simplicity of the design sometimes cannot save oil heater from breakdown, which usually occurs at the very inopportune moment.
Difficulties in troubleshooting can only be caused by oil leak, the appearance of which can be easily detected by visual inspection of the device. Oil leaks that appear on the heater body indicate that the device must be turned off urgently, and then take care of purchasing a new heating device.
Some craftsmen are able to bring an oil heater back to life even after such a malfunction occurs, but this work quite complex, which takes a lot of time. Such repairs are rarely done.
To correct other damage usually contact a specialist However, with basic knowledge of electrical engineering, it is quite possible to solve the problem yourself.
Attention! Any repair of an electric heater must be carried out in compliance with safety regulations. The device must be disconnected from the power supply.
Experts believe that it is correct fault determination makes the repair of the device already half completed. Therefore, the first step in repairing an oil heater is always diagnosing the device. In order to find a device malfunction, you need to know how it works and what parts are included in its design.
Appearance an oil heater most often resembles regular battery
heating, however, this device sealed, and its inner space filled with oil.
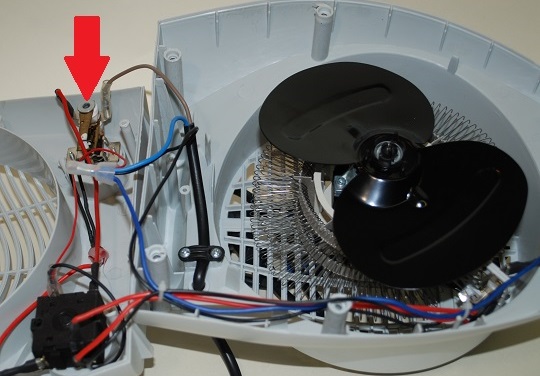
At the bottom of the container heating element inserted. A thermal fuse is located near the heating element, which serves to turn off the heater if the temperature of its body increases excessively.
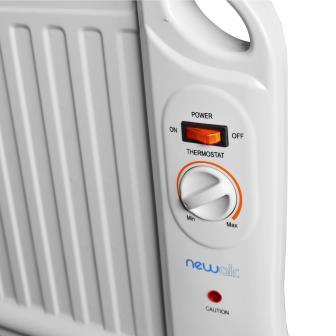
Thermal relay usually located in the upper part of the body, without touching it. A switch is placed near the relay. If it is present, there is no need to remove the plug from the socket to turn off the heater.
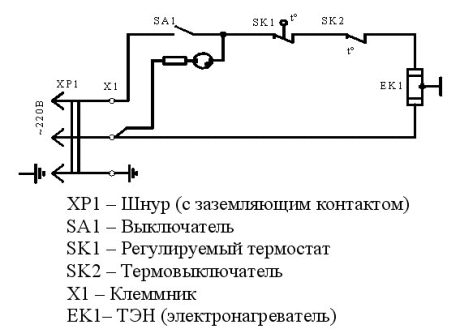
The simplest oil heater diagram looks like that: 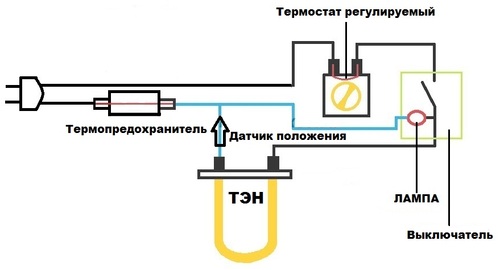
When the switch closes, after plugging in the electrical appliance, the heating element immersed in oil begins to heat up. The start of operation of the device is indicated by a light bulb.
Using an adjustable thermostat, it is determined Maximum temperature, after which The heating element will turn off. It will switch back to heating mode after the device has cooled to the set temperature.
Adjusting the Thermostat occurs by a bimetallic plate located inside it. The position sensor is designed to break electrical circuit when the heater tips over.
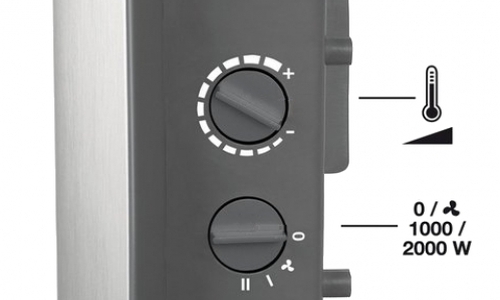
For better management to operate the device, it is equipped with two heating elements. In this case, two switches are installed on the housing. With their help, the heating power is regulated. When adjusting, one of the heating elements can be turned off.
The schematic diagram differs practically little from a conventional heating device. Its main difference is that in the presence of a fan, the heating elements impossible to turn on if the fan does not work for some reason. This heater circuit prevents damage to the heating elements from overheating.
Oil heater malfunctions and repairs
 If yesterday the heater worked properly, today stops heating, then there is no need to immediately run to the workshop, or to the store for a new heating device.
Many malfunctions are quite possible fix it yourself, having basic skills in repairing electrical appliances.
An exception may be faulty heating element, most often tightly rolled in the heater body. It is quite possible to remove it, but it will not be possible to put it back in place. Even if the heater is equipped with a removable heating element, it will be difficult to ensure the tightness of the device when replacing it.
Typically, malfunctions that occur when a heater breaks down appear in more accessible places. The most vulnerable point The device is a cord, so its integrity should be checked first. If the design of the plug allows it to be disassembled, then you need to check the junction of the cord cores with the pins of the plug.
If the plug is working properly the next step should be to check the condition of the cord itself, as well as the location of its connection to the heater’s power supply. To do this, remove the decorative cover of the device panel and use a tester to check the serviceability of the cord. If it is damaged, the cable is replaced with a new one.
 If the cable appears to be working properly, then the fault may be hidden in the state of the power supply contacts. The contacts may be coated with carbon deposits and weakened.
In this case, the contacts are cleared of carbon deposits. sandpaper , and loose contacts are carefully tightened.
The thermostat is located in the same place. If darkening is visible on its contacts, then they also need to be cleaned. The thermostat may be faulty bimetallic plates. If damage is detected, the thermostat is carefully disassembled and the plates are replaced with new ones.
If the oil cooler belongs to the category energy saving, then its design contains a thermostat that ensures the device is turned on and off at the specified parameters.
In case of excessive heat heater, or at low temperatures it also needs to be inspected. If a malfunction is detected this part changes to a new thermostat with similar parameters.
If there is a fan in the oil heater design, it is also need to check. In this case, not only the contacts of the device are checked, but also the integrity of the winding of its motor. It is possible that it may need to be replaced.
After completing the above-described checks and eliminating the detected faults, the heater is assembled and then connected to the network. If the heating device still doesn't work, then you will have to seek advice from a specialist.
Most likely that he will recommend purchasing a new heater. Some repairs can be so expensive that it's easier to head to the store.
You will find the structure and electrical diagram of the oil radiator in the video:
For instructions on how to repair (replace the heating element) an oil heater with your own hands, watch the video:
No matter how high-quality an electric heater is, sooner or later it begins to heat poorly or stops working altogether. Electric heaters are not complex devices and they very rarely break down after purchase during the warranty period.
I’ll say right away that the simpler the design of an electric heater, the less often it will break down and the easier it will be to find and fix the problem.
I don't recommend it on my own repair oil radiators, because inside it there is a special coolant - transformer oil. In order to disassemble it, you will first have to drain and then refill the transformer oil, and this is a very troublesome and time-consuming task. If oil just starts to leak a little from the oil cooler, then I recommend soldering the leak with your own hands or carefully welding it semi-automatic welding. In such cases, it is useless to use various sealants or glue to eliminate the leak.
Always unplug the heater- before starting work on disassembling or testing the device components with a multimeter.
In order to quickly and effectively find and fix a malfunction, you need to know the structure of the electrical appliance, as well as how to check all its components for serviceability. For convenience, below I will immediately talk about the design of the electric heater, and then about checking and repairing all components in order.
How does an electric heater work?
Practically, heaters are designed similarly. Both simpler and more complex models are available. We will look at the device of the most complex option. In more simple models The thermal fuse and tilt sensor may be missing from the circuit.
Let's consider a more simplified version with one-key switching and one light bulb. Often heaters are equipped with a two-key switch and several indicator lamps; the operation scheme will be similar, the only difference being that instead of one key there will be two, and there will be two heaters in one case. In convection options, a sensor for preventing objects from getting inside is often built in, but it connects and disconnects the power supply in the same way as a position sensor.
Any modern electric heater consists of from a plug with a power cable, which is connected through a thermostat and a switch to a heating element installed in the housing - a heating element. Very often the heating element has not 2, but 3 contacts for connection. The first power supply wire is connected to one, and from the other from the socket - two other wires connected from two-gang switch, which allows you to turn on either one spiral or two at once - at full power.
The circuit may contain a thermal fuse, which automatically turns the device on and off to protect against overheating. A tilt sensor can also be installed, which opens the circuit when the heater is tilted above the permissible angle. In convection expensive models Other sensors are also installed. For example, protection against objects getting into the device.
On some models There may be a fuse to protect against overload currents or short circuits, which is triggered in emergency situations.
Step-by-step instructions for repairing an electric heater
- First thing, Before you start repairing it yourself, unplug the heater from the outlet.
- Unscrew the bolts or self-tapping screws and take out the control panel with a switch and a thermostat or thermostat.
- If the device does not work at all and the light bulbs do not light up, then we check for the presence of 220 Volts on the wires of the cable connected to the outlet via. We replace the faulty cable or plug with a new one. Just be careful- may have stopped working electric outlet, and the heater will be fully operational.
- Next, on the device unplugged from the outlet We check the serviceability of all switch keys. In the on position, the contacts should have short circuit, and when turned off, the resistance is infinitely large (open circuit).
- At the next stage of repair checking the thermostat. The multimeter should show zero (short circuit) or small resistance on the contacts.
- If the problem is still not found, then you will have to completely disassemble the electric heater with your own hands in order to get to its remaining components.
- Sometimes the cause of the problem can be quite simple.- this is poor or absent contact at the points where the wires connect to the terminals. Reliability is checked by visual inspection, but it is better to use a multimeter for this purpose.
- Followed by check the heating element for integrity or heating element, usually consisting of two circuits. To connect it, one common wire and two wires coming from the two-key switch are used. To check, set the multimeter to resistance measurement mode. For example, in my personal heater, one heating element shows a resistance of 50 Ohms, and the other - 100 Ohms. Very often, the heater stops heating at full power due to the failure of one of the heating element circuits, which cannot be repaired and is replaced with a new one of similar characteristics.
- Very often the cause of heater failure is the failure of the thermal fuse., of which several can be installed in the housing. If at least one breaks down, all Tens will stop working.
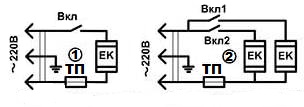 The thermal fuse is simply checked (in the picture it is marked as TP) - there should be zero resistance or short circuit between its contacts. If the device has more than one thermal fuse, then we simply remove the faulty one and connect the wires to each other, not forgetting to use heat-resistant materials for insulation. Please note that sometimes the thermal fuses may be all good, but the reason for their operation may be overheating of the convection heater due to clogged filters or air exchange holes.
 - Next you should check the position sensor, consisting of a weight, which, when the device is tilted, presses the microswitch and opens the circuit. In a vertical position, there should be zero resistance or short circuit between the contacts.
- In fan heaters and some other types of electric heaters, a fan is additionally installed; if it begins to make a lot of noise during operation or does not work at all, then read our
Your heater has served you for many years and suddenly stops working. No need to get upset and run to the store for new purchase. You can try to bring the heater back to life yourself. How to repair an oil heater with your own hands so that it will faithfully heat you for many years in the most severe frosts?
How the device works
The device itself can be compared to a conventional incandescent coil, which is connected in parallel by a wire to a power switch. The power switch is a thermostat or thermostat.
The thermostat will make a very soft transition from one resistance value to another. Its main task is to maintain the established temperature regime. As a result of heating the thermostat plate, the contact is disconnected.
- Malfunction of the relay that maintains the temperature regime. Elimination - replacement.
- The thermostat switch is broken. Elimination - replacement.
- The thermostat contacts have oxidized. Troubleshooting - clean oxidized contacts.
- There is a problem with the electrical cord or outlet.
- Poor or no contact between the socket and plug.
How to determine the cause?
In order to repair the heater, you first need to find out what exactly is wrong with it. They start with the simplest, but at the same time basic element of electricity. First, check if your outlet is working. It also happens when a non-working heater is disassembled, but the whole problem was in the socket.
Next we move on to inspecting the cord itself. Check for any damage or fractures. In such places, as a rule, wires can become disconnected. Repair of oil heaters should begin with checking the wire not only from the outside, but also from the inside. It is possible that the connection in the power supply unit, the device that connects the power cord directly to it, has become loose.
If you don't find any damage on the outside, you need to look possible malfunctions in the power supply itself. To do this, you need to remove the power supply panel cover, then remove the washers and carefully inspect everything. Especially the connection of the wire to the power supply terminals.
If there was any carbon deposits, they cleaned them off, rang the wire, tightened the screws. Now put the power supply cover back in place and tighten the screws. Before plugging the device into a power outlet, be sure to make sure that there is no possibility of a short circuit; use an ohmmeter to do this.

Try connecting the device to the network. If it works, then you can be congratulated on the fact that renovation work are over. If the oil heater still does not work, then repair work will have to continue.
Thermostat
If they are black, it means a short circuit has occurred; the device can be revived by sanding the contacts until they shine. After cleaning, for a more effective result, it is better to wipe the contacts with alcohol.
How to repair a heater if the bimetallic plate is suspected of breaking? The bimetallic plate is located in the same thermostat. Therefore, you first need to disassemble the thermostat, and only then remove the plate. In such a situation, there is only one repair complete replacement bimetallic plate.
Safety
The causes of breakdowns can be very diverse, but they are all related to electricity. Therefore, it is extremely important to follow safety precautions when working with the device. Under no circumstances should the device be plugged in if the cover of the heater power supply is not closed.
It is not allowed to start disassembling a device that is not disconnected from the network. It is better to make sure once again that the device is turned off. If during operation of the heater you feel bad smell burns, turn off the device immediately. Start investigating the reasons that led to the breakdown only after the device has completely cooled down.
In order for an oil heater to serve you faithfully for many years, it is important not only to choose the right model of the device, but also to operate it correctly. In this case, you will not have to independently figure out the reason why the device stopped working, and you will also save yourself from wasting money caused by buying a new device.
terms of Use
Caring for an oil heater primarily involves correct operation compliance with all terms and conditions.
- During operation, the surface of oil heaters can become very hot, up to about 100 degrees. If there is no special protective screen, you can easily get a severe burn. There is often a great temptation to hang wet laundry on the device to dry, rightly believing that it will dry instantly. Of course, it will dry out, but it can also lead to damage to the device. Hanging wet laundry to dry does not allow the device to cool down in the room, so it cannot cool. Because of this, its internal components begin to overheat. The result is a breakdown. If you really want to use a heater to dry clothes, buy special device, which is attached to the device from above and you can lay out wet laundry without damaging the device.
- It is advisable to wipe the heater from dust accumulating on it as often as possible. This also saves the device from overheating and increases its thermal output. In addition, dust burning on the heater can cause an unpleasant odor.
- The device must not be installed in wet areas. Oil radiators are not intended for use in bathrooms or showers. The most perfect place for such devices these are spacious, dry rooms.
- It is not advisable to use oil radiators in small rooms. The truth is that this makes things worse for the owners of the device themselves. On small area the device simply cannot function correctly. Therefore, very often there is a lack of oxygen and too dry air in rooms.
- The oil heater should only be operated in a vertical position. Even its storage in the summer, when there is no need to use additional heat sources, should only occur vertically. If it turns out that the device for a long time lying in a horizontal position, let it stand before turning it on. This is necessary so that the oil completely flows down, and the heating elements do not overheat due to a lack of heat conductor.
- It is not recommended to use adapters to connect the radiator. This usually happens when the socket in the room does not have a Euro connector. If such a need arises, then it is better to buy a really high-quality, reliable conductor. Most often you can find cheap options in stores. When connecting a device using them, the contact is not complete. As a result, the device turns on and off. This will not end well for the heater; it may simply burn out.
As you can see, in order for an oil heater to work well and for a long time, no extra effort is required. Prevention during operation of the device will only be beneficial. Proper care can increase the service life of the device.
Another important point: Never leave the radiator on when leaving home and do not place it close to upholstered furniture or curtains. In general, everything that can easily catch fire. Moreover, you don’t need to place the device in close proximity to your own bed, because you can simply forget about it and get completely unpleasant sensations in the morning.
Use of materials is permitted only if there is an indexed link to the page with the material.
An oil cooler breakdown can happen unexpectedly and at a very inopportune moment. If oil stains appear on the housing, the device should be immediately unplugged from the network and think about purchasing a new heat source. In case of other malfunctions, the device can be brought back to life with the help of a specialist or independently. It is recommended to undertake the repair of an oil heater with your own hands only if you have basic knowledge in the field of electrical engineering, while not forgetting about compliance with safety precautions.
Major failures of oil radiators
Any repair begins with diagnostics. It is important to correctly determine the cause of failure and calculate the faulty part.
- Do not be alarmed if the heat source begins to make a cracking noise immediately after being turned on. As a rule, this happens when the mineral oil inside is heated. Crackling is considered normal and does not affect the operation of the electrical appliance. Sometimes moving the radiator to a perfectly level place helps reduce noise.
- If the heater stops turning on, the first thing you should do is rule out a breakdown in the outlet and plug the device into another power source. The most common failure in this case is a loose contact, in second place is a malfunction of the plug, and in third place is damage and breaks in the cord.
- If the heater shows signs of operation (indicators light up, fans turn on), but does not heat up, the cause should be sought in the thermostat. This spare part is easy to buy and replace with your own hands.
- A cold case may also indicate that it is out of working order. heating element– this is a rather serious reason and it is not recommended to eliminate it on your own.
- If the device does not turn off after heating to the set temperature, this may indicate a malfunction of the thermostat - such work becomes not only uncomfortable and dangerous, but also uneconomical in terms of energy consumption.
Repair tools: screwdriver and multimeter
DIY troubleshooting
The oil radiator is a non-separable structure, so you must not break the sealed housing of the device when trying to replace a faulty heating element. Self-repair of an oil heater is only possible at the level of the cord, plug and control unit. To the delight of home craftsmen, the most frequent breakdowns happen in these places. In order not to get confused in spare parts, it is recommended to group all fasteners and parts and make step by step photos during operation - this will make it easier to assemble the device in reverse order.
Electrical diagram oil heater
The heater does not turn on: procedure
First of all, the cord is inspected and carefully palpated, trying to detect any kinks. If the cord has been in a bent state for a long time, most likely a defect has formed in this area. The plug, if its design allows, is disassembled and the integrity of the contacts is checked. Most often, the problem is hidden at the point where the pins of the plug meet the ends of the current-carrying wires of the cord.
If there are no visible signs of failure on the cord and plug, you should use a special device - an ohmmeter and “ring” the cable. It is also necessary to audit the connection electric wire with the power supply terminals and check the condition of the unit by first removing the decorative cover of the front panel. Detected carbon deposits are removed by thoroughly cleaning the elements. Loose fasteners are carefully tightened, restoring contacts. If you have a new power cord with a socket in stock, you may notice an aged cable with it.
Checking the contacts in the power supply
In order not to disassemble the power supply a second time, it is recommended to immediately inspect the thermostat. To gain access to this module, you need to slightly lift the armature of the device and inspect the contacts. Darkening indicates that there was a short circuit in the electrical appliance. Its consequences can be easily eliminated by cleaning the electrical contacts with sandpaper and treating with alcohol. Small debris generated during the cleaning process is removed from the unit with a vacuum cleaner.
Checking the functionality of the thermal fuse
Damaged tires are also subject to replacement - new blanks can be easily cut from a sheet of brass of the same thickness, using the old parts as a template. Holes for fasteners are drilled with a drill. The temperature regulator has bimetallic plates, which, if damaged, must be replaced. To remove the plate, disassemble the thermostat by carefully and sequentially unscrewing all the nuts.
The radiator heats up excessively or does not heat well
These polar problems have one root - a malfunction of the thermostat. To find the cause, an important module is disassembled and carefully inspected. The safest thing to do is to replace this part by looking for spare parts for oil heaters on sale. You can try to adjust the settings yourself by setting the armature stroke within 1.5-2.5 mm. Ideally, it should move abruptly from the magnet to the stop.
Thermostat for oil cooler
Another important spare part: thermal relay
After completing the repair, the device is assembled and connected to the network. The absence of the expected result is a reason to contact a specialist or an eloquent hint that it is time to purchase a new electric heater. It is strongly not recommended to replace heating elements at home, as well as welding and soldering a damaged housing.


