Due to their strength, durability, unpretentiousness and versatility, concrete floors are popular not only in rooms where large loads are expected on the floor surface, but also in private housing construction. For example, concrete floors in the kitchen, bathroom and toilet are a must. And in bedrooms, hallways, living rooms and other rooms, concrete pouring began to be used with the advent of the “warm floor” system, which solved the important problem that such a floor is very cold. Even in private houses, where previously they were furnished exclusively wooden floors on the joists, they began pouring concrete everywhere. And here questions began to arise about how to pour a concrete floor on the ground and what are the features of pouring on floors. In this article we will reveal general technology fills and indicate some nuances and differences.
Technology for laying concrete floors
Concrete floors can be installed on various surfaces: directly on the ground, on a floor slab, on an old concrete surface, even on an old wooden floor. Concrete is a simple, undemanding material, accessible to everyone, and, importantly, relatively cheap.
In order for the floor to ultimately be strong and durable, all technological conditions and stages of work must be fulfilled. When pouring concrete on different surfaces exist distinctive features, but there is also general rules for all occasions.
Concrete floors - pouring technology and stages of work:
- Waterproofing the base.
- Thermal insulation.
- Reinforcement.
- Installation of guides (“beacons”).
- Pouring a rough concrete floor.
- Grinding the surface of a concrete floor.
- Filling the leveling screed.
Depending on the design features premises, some stages of work may be added. For example, when laying a concrete floor on the ground, bedding should be done on the base.
To protect the concrete screed from cracking, expansion joints are cut into it, of which there are three types:
- Insulating expansion joints are carried out in places where the concrete floor comes into contact with other structural elements buildings: walls, columns, ledges, etc. This is necessary so that vibrations are not transmitted from the floor to other structures. Otherwise, there may be a distortion or partial destruction of the foundation.
- Construction seams are carried out in places where concrete hardens unevenly, i.e. in the event that the filling did not take place in one go, but with breaks that lasted more than 4 hours.
- Shrink seams performed to relieve stress due to uneven shrinkage and drying.

Expansion joints must be cut before random cracks appear, but the concrete must already have gained the necessary strength. The depth of the joints should be 1/3 of the thickness of the concrete layer. Subsequently, the seams are filled with special sealants.

Considering the labor-intensive and dusty work of laying out a concrete floor, many hire construction crews to carry it out. For concrete floors, the price depends, first of all, on the labor intensity of the work ordered and the thickness of the layer. The cheapest option would be regular cement-sand screed. Covering with reinforcement will cost a little more. The cost of a concrete floor is influenced by the type of reinforcing mesh: if it is a regular road mesh, it will be cheaper, and if it is a frame welded from reinforcement, then it will be more expensive. The most expensive option is a concrete floor with a reinforced top layer; it will cost 30 - 40% more than a regular floor of the same thickness.
With minimal construction skills, knowing how to use a tool, and inviting one or two partners, you can easily pour a concrete floor with your own hands. It is enough to make calculations, stock up on the necessary tools, materials and study the technology so that everyone performs their functions and the matter goes smoothly. Then the price for pouring a concrete floor will depend only on the material that will be used and its quantity.
How to make a concrete floor on the ground correctly
Laying out a floor directly on the ground always involves a number of questions: what to use for the bedding, and what layer to use, how to waterproof it, and at what stage to insulate it, and so on. The concrete floor on the ground is a “layered cake”, which we will discuss below.
Pouring a concrete floor: “pie” diagram

Conditions under which laying a concrete floor on the ground is possible
Before going directly to technological process when arranging a concrete floor, I would like to note that not all soils can be used to pour a concrete floor. Firstly, the level groundwater should be no higher than 4 - 5 m to prevent the floor from flooding and moisture being sucked through the capillaries. Secondly, the soil should not be mobile, otherwise the concrete floor can quickly collapse, damaging the foundation. Thirdly, the house in which such a floor is planned must be residential and heated in winter time, since the soil freezes in winter, and with it the floor, which will have an impact extra pressure on the foundation, deforming it. Well, the last limitation is that the soil must be dry.
Marking the level of a finished concrete floor: “zero” mark
We begin all work on the flooring only after all the walls have been completely erected and the building has been covered with a roof. This way we will be protected from the surprises of nature.
The first step is to outline finished floor level, i.e. the mark to which we will fill the floor. Since we do not plan to create a threshold, we will focus on the bottom of the doorway so that the floor is level and the same in all rooms.

We apply the “zero” level as follows: from the lowest point of the doorway we set aside exactly 1 m. We apply a mark to the wall, then transfer the mark to all the walls in the room, draw a line, the horizontal of which is constantly controlled using a level.
After the line has been drawn, we set aside 1 m downwards from this line along the entire perimeter of the room. We draw a line. This will be the finished floor level. For convenience, we hammer nails along the lines in the corners of the room and tighten the cord. This will make it easier to navigate.
Foundation preparation work
We remove all construction waste from the premises. Then we remove upper layer soil and take it out for garden or landscape needs. To what depth should the soil be removed? The concrete floor on the ground is a multi-layer cake, about 30 - 35 cm thick. Focusing on the “zero” mark, we are trying to remove the soil to a depth of 35 cm.
Be sure to compact the surface of the soil. It is better to do this using a special vibrating plate or vibrating machine, but if you don’t have such equipment in your arsenal, you can make do with improvised means. We will need a log to which we will attach handles, and we will nail a flat board underneath. Using this log together, we compact the soil to such an extent that no traces of footsteps remain on its surface.
Important! In case of high strip foundations There are situations when the distance from the “zero” mark to the ground is more than 35 cm. In this case, we remove the top fertile layer, and instead pour sand and tamp it thoroughly.
Measures for additional waterproofing of the floor may include the installation of a clay bedding. Then clay is poured on top of the soil and thoroughly compacted. In the future, it will prevent moisture from penetrating into the floor.
Formation of bedding from gravel, sand and crushed stone

Before making a concrete floor on the ground, it is necessary to fill it.
First layer - gravel(5 - 10 cm). Add water and compact. To make it easier to control the thickness of the layer, we drive pegs of the required length into the soil, set them level, and after backfilling and compacting, remove them.
Second layer - sand(10 cm). We control the thickness and level with the same pegs. We spill the layer with water and compact it with a vibrating plate or a log with a board. For this backfill, you can use ravine sand with impurities.
Third layer - crushed stone(10 cm). Carefully level and compact. Our task is to make sure that there are no sharp edges of crushed stone on the surface. If there are any, you need to smooth them out by unrolling the stones or removing them. Crushed stone with a fraction of 40 - 50 mm should be used. After compaction, the crushed stone can be lightly sprinkled with sand or crushed stone chips and compacted again.
Important! Don't forget to control the horizontal using a level.
It should be noted that backfilling can be done only from two layers: sand and crushed stone. Also, to simplify control over the thickness of the layers, their level can be applied to the foundation walls.
Laying waterproofing and thermal insulation

If the crushed stone layer is compacted tightly and is not observed sharp corners, then the waterproofing material can be laid directly on it. To do this, you can use modern roll materials and membranes, roofing felt in several layers, or simply polyethylene film with a density of at least 200 microns. We spread the material over the entire area of the room, bring the edges to the “zero” mark on the walls and secure it there, for example, with tape. If the canvas is not enough to cover the entire area, then the joints must be made with an overlap of 20 cm and taped with adhesive tape.
Thermal insulation can be done on top of the waterproofing using the following materials: expanded clay, perlite, extruded polystyrene foam, expanded polystyrene(Styrofoam), stone basalt wool(corresponding density), polyurethane foam.
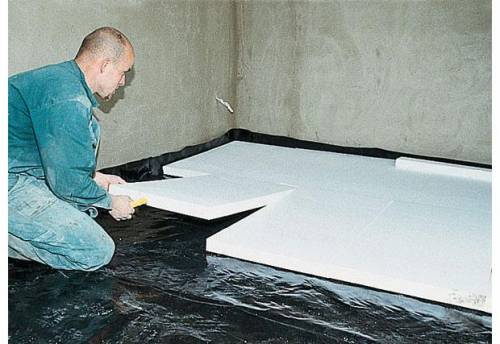
Consider the option of laying extruded polystyrene foam slabs. They are laid out in a checkerboard pattern, close to each other, the joints are glued using a special adhesive tape.
Important! There are cases when it is not possible to perform hydro- and thermal insulation directly on the bedding. Then a layer of so-called “skinny” concrete (liquid consistency) up to 40 mm thick is poured on top of the bedding. When it hardens, you can perform the above procedures on top. “Skinny” concrete firmly binds the crushed stone layer together and is a stronger base that will not be able to break through or damage waterproofing materials.
The technology for pouring a concrete floor necessarily includes reinforcement in order to maximize the strength of the floor. A reinforced floor can withstand heavy loads, which are evenly distributed over the surface.
Can be used as a reinforcing material metal And plastic mesh with different cells, as well as rebar frame. The most commonly used are welded reinforcing mesh with dimensions of 5x100x100 mm. Less commonly, for floors that will bear heavy loads, a frame welded in place from reinforcing rod 8 - 18 mm thick is used. In this case, more thorough vibration compaction of the concrete mixture will be required.

The reinforcing mesh or frame cannot be laid directly on the base, as it will not perform its functions and will even be redundant. It must be raised to 1/3 of the thickness of the future concrete pouring. Therefore, we install the mesh or frame on stands 2–3 cm high, which are called “chairs.”
Installation of “beacons” and formation of “maps”
Installing guides, or “beacons” as they are also called, allows you to pour the concrete mixture as smoothly as possible, at the same level.
Pipes can be used as guides round section or metal square profile, as well as wooden blocks, if their surface is smooth enough, you can lay special “beacons” made of aluminum.
We divide the room into segments 1.5 - 2 m wide.
We install the guides on the “buns” made of concrete mortar. By pressing them or adding mixtures, we control the location of the “beacons” so that their upper edge is strictly along the “zero” line. Lubricate the guides with special oil, as a last resort can be worked on to make them easier to extract in the future.

Important! We control strictly horizontal arrangement guides using a level and level. It will be possible to pour the floor with concrete after the “buns” have hardened enough so that when you press the “beacon” they will not press through.
The division of a room into “maps” is carried out if its area is large enough and it is not possible to fill it with concrete in one step. Then the room is divided into square or rectangular “cards”, the size of which is dictated by the productivity of the construction team.
We mark the area into sections. We knock down the frame formwork from freshly sawn wood or from laminated plywood. Naturally, the height of the formwork must be strictly set to zero.
Preparation of mortar for pouring a concrete floor
In order for the concrete floor to have the best possible thermal insulation properties, expanded sand or perlite should be added to the solution. And in order to have time to pour and mix the solution efficiently, you need to purchase or rent a concrete mixer.
The secret to preparing the solution is:
- Pour 2 buckets of perlite into a concrete mixer.
- Add 10 liters of water and mix. After adding water, the volume of perlite should decrease noticeably.
- When the sand is well mixed with water, add 5 liters of cement and continue kneading.
- Add 5 liters of water and continue kneading.
- When the mixture becomes homogeneous, add 10 liters of sand and 2 liters of water. Knead until the mixture becomes loose.
- We pause in the kneading for 10 minutes, and under no circumstances add water.
- After 10 minutes, continue kneading until the solution becomes plastic.
To fill the floor, it is best to use cement M400 and M500.
Pouring a concrete floor, leveling the mortar
We begin to fill the floor from the corner opposite to the door, trying to fill several “cards” in one or two steps.
Since the concrete should not fit tightly against the walls and protruding structures of the building, we isolate them by laying a damper tape along them.

Pour the resulting solution into a “card” in a 10 cm layer and level it with a shovel. We perform piercing movements to remove excess air and compact the solution. If possible, you can use a deep vibrator, which is immersed in concrete, and when concrete “milk” appears on the surface, it is transferred to another place.
We level the solution using the rule. Install it on the guides and pull it towards you light movements left-right. This way, excess concrete is removed and distributed into the voids of other “cards”.

After completing the leveling of the solution along the guides, remove them and fill the free space with fresh solution.
In the following days, constantly moisten the surface with water; you can additionally cover the concrete with film. We allow the concrete to gain maximum strength characteristics within 4 - 5 weeks.
Leveling screed for concrete floor
When pouring a concrete floor, it is rarely possible to make the surface perfectly flat; most often there are minor flaws and sagging. If you plan to lay ceramic tiles, then perfect evenness is not needed, so you can start work right away. But if you want to make a floor from laminate or linoleum, then the surface must be perfectly flat.
Self-leveling mixtures allow you to make the floor surface mirror-smooth.

According to the instructions on the package, prepare a solution of self-leveling mixture, pour it onto the floor and level it with a special brush. Then roll with a needle roller to remove air bubbles from the solution. Leave to dry for at least 1 week. After which the concrete floor is ready for use.
How to properly pour a concrete floor over ceilings

The peculiarity of pouring a concrete floor over floors is that there is no need to backfill.
Checking concrete slab ceiling, whether there are cracks, cracks or chips on it. If we find it, we seal it with repair mortar. Wooden floor It should also be durable, without large gaps.
It is mandatory to waterproof the ceiling by laying polyethylene film with a density of 200 - 300 microns.
We lay thermal insulation on top. This can be polystyrene foam, extruded polystyrene foam boards, basalt wool or spraying polyurethane foam.
We install the beacons and fill the solution with a thickness of 100 mm. We perform all other operations in the same way as in arranging a floor on the ground. If you don’t understand something in the pouring instructions, perhaps watching a video demonstrating a concrete floor will help you.
It is quite possible to do the pouring of a concrete floor yourself, the main thing is not to skimp on materials and follow the technological process. Then the floor can last for decades without requiring major repairs.
Pouring a concrete floor: video - example
Concrete floors and foundations are widely used in civil and industrial construction. Concrete foundations (or preparations) are installed in private houses, one-story workshops industrial enterprises under floors: cement, asphalt, made of cast iron plates. Place them on prepared or leveled soil.
Concreting the floor on the ground
The Navigator company is a high-tech company with its own laboratory and fleet of concrete mixers and concrete pumps. Contact us!
When concreting on the ground, it must be pre-prepared.
- With dense earth layers concrete base arranged directly on the graded ground.
- If the soil is bulky or its structure is disturbed, it must be compacted. If the place is inaccessible for mechanisms, then the thickness of the soil being compacted hand tools, should not exceed 10 cm.

- Before concreting, crushed stone or gravel is rolled or compacted into the surface of soft soils. The thickness of the formed layer is 6-15 cm.
- Before laying concrete on water-saturated clay, silty soils and loams, care must be taken to lower the groundwater level. The soil layer must be dried until it meets the design bearing capacity. If the groundwater level is high, crushed stone filling can be used. In a comprehensive drainage system crushed stone filling promotes rapid drainage of water. A hydraulic barrier is laid directly on the crushed stone - special films that prevent water from penetrating into the concrete base (capillary suction).
- Soils that experience significant shrinkage must be replaced or strengthened. In the second case, reinforcement of the concrete base with reinforcing mesh is used.
It is not permissible to level and compact soils containing impurities of snow, ice and frozen soil. Concreting the foundation on frozen ground is prohibited.
Reinforcement for floor concreting
When constructing concrete foundations and floors that are planned to bear significant loads - in industrial, warehouses, it is necessary to carry out reinforcement work. For this purpose, a mesh is made from reinforcement with a diameter of 8 mm.
For floors with high load, the mesh cell is 100x100 mm, for floors with medium load - 180x180 mm, for floors with low load - 240x240 mm.
Depending on the load, the thickness of the concrete base is also standardized:
- for intensive loads - at least 200 mm, reinforcement is installed in two or more tiers;
- for medium ones - at least 120 mm.
It is not permissible to lay reinforcing mesh directly on crushed stone. The gap should be about 20 mm.
Reinforcement of a concrete base leads to a significant increase permissible loads and is mandatory when installing monolithic floors.
Concreting the floor in a house: basic techniques and rules

Before concreting begins, beacon boards are installed using a level so that their top edge is flush with the planned base surface. The distance between the boards is determined by the length of the vibrating screed and is equal to 3-4 meters. The lighthouse boards are secured with wooden stakes driven directly into the ground. The length of the strips is selected as long as possible. The level of the laid concrete mixture before leveling and compaction should not be higher than 2-3 cm of the surface of the lighthouse boards.
Concreting must be done in strips one after another. It is recommended to start work from places that are at the maximum distance from the entrance or passage.
After the concrete strips have hardened, you can begin work on filling the gaps, having first removed the lighthouse boards.
The concrete mixture is compacted using a vibratory screed, which is a steel profile - a channel or I-beam with one or two electric motors attached to it. The use of a vibrating screed promotes uniform distribution of concrete over the area and the release of air from the mixture. The rack with the vibrator is pulled along guides, which are dismantled after the concrete mixture begins to set. The resulting channels are filled with concrete mortar.
When compacting the subsequent strip, the already vibrated area should be covered by a vibrating screed by 150 mm.
If a break is planned in the work, it is not allowed to install a vibrating screed at the edge of the laid layer, as this can lead to slippage and delamination of the mixture. Before a break, a partition made of boards must be installed at the place where work is temporarily completed. The last portion of the solution is leveled and compacted along it.
If the work is carried out with a concrete paver, then, depending on the conditions of its implementation, one of two methods is used:
- “Pull-on” - the unit moves behind the concreting area. This is the most preferable option, since the concrete in the area where the paver is working has time to gain the strength necessary for further movement.
- “Pulling” - the unit moves ahead of the concreting front.
Concreting a garage floor
The most popular garage flooring is concrete, which has important characteristics: strength, resistance to chemicals and water, fire resistance. In addition, a concrete floor is a relatively cheap solution and lasts a long time.
A concrete garage floor should not be installed under either of these two conditions:
- high probability of garage flooding;
- significant slope of the area on which the garage is located.
You can watch the video for more information about concreting a garage floor:
Construction of expansion joints
If the room is not heated or has a large area, then it is necessary to install expansion (temperature-shrinkage) joints. Longitudinal seams are placed through two stripes. Transverse seams are made every 9-12 meters along the length of the strip. In this way, the concreted area is divided into separate rectangular slabs 9-12 m long and 6-9 m wide.

For the device of longitudinal expansion joints use boards coated with hot bitumen or wrapped in roofing felt. After the concrete has hardened, the boards are removed and bitumen or special composition. The seam can be made by coating the hardened edges of the strips with heated bitumen before pouring the adjacent strip. The thickness of the coating layer is 1.5-2 mm. Such measures relieve stress on the concrete surface and prevent cracks from appearing in the concrete.
To construct transverse temperature-shrinkable seams, metal strips 5-7 mm thick are used. The width of these elements can vary from 60 to 180 mm. The strips are laid during concreting and removed after about half an hour. After the final setting of the concrete mixture, the resulting furrows are cleaned and filled with cement mortar or bitumen.
Methods for treating the surface layer of concrete floors and bases
If the concrete layer is the finishing layer, then after the concrete mixture begins to set, its surface is treated with “helicopters” - special machines. The plastic blades of these units smooth the top layer of concrete, rubbing in the “cement milk” and thereby strengthening the surface.

The finishing layer of concrete or cement mortar is laid in the same way as the base - in stripes one after another. The width of the stripes is 2-3 meters.
At small areas the surface of clean concrete floors is finished using a special board or rubberized tape, the length of which should exceed the width of the concrete strip by approximately one and a half meters. The width of the tape is 300-400 mm, its ends are attached to the handles.
Pre-smoothing of the compacted mixture should be done approximately half an hour after laying. The final smoothing is carried out 15-20 minutes after completion of the preliminary operation. The movements of the belt should be shorter.
If to concrete floor If there are increased requirements for abrasion resistance, then half an hour after final leveling the surface is treated using a metal trowel. The purpose of the operation is to expose crushed stone grains. If high abrasion resistance is not required, then a cement floor can serve as the finishing layer.
If necessary, obtain increased density The floors are iron-plated. The essence of this event is to rub dry sifted cement into a still wet concrete surface until an even shine is obtained. If concrete surface If it has already dried, it needs to be moistened with water. Ironing can be done manually with steel trowels or using trowels.
Before laying cement floors or floors made of piece materials on a concrete base, its surface must be cleaned of dirt and cement film. If the concrete is in early age, then mechanical steel brushes are used for this purpose. On concrete that has reached significant strength, grooves 5-8 mm deep are cut at a distance of 30-50 mm using a pneumatic tool. The resulting rough base surface provides good adhesion to the top layer.
Compositions for improving the performance of concrete floors and foundations

When grouting the final concrete floor, you can use special mixtures - mineral powder hardeners. These compounds (such as “Extra-Top”) increase the resistance of floors to abrasion and chemicals, and prevent dust formation.
The second option for strengthening a concrete floor is to treat it with epoxy compounds. To do this, the base must be impregnated with a deep penetration primer based on epoxy and painted using the pouring method.
This method can only be used after the concrete has reached 28 days of age.
To improve operational and decorative qualities For concrete floors, polyurethane-based compounds are also used.
Compliance with the rules for constructing concrete floors, application modern mechanisms and tools, advanced technologies creating a finishing layer allows you to obtain reliable, durable coatings with the required strength and aesthetic characteristics.
GD Star Rating
a WordPress rating system
Comments:
Concreting a floor is a labor-intensive, complex and long process, the result of which, with a qualified approach to the work, will be a smooth floor without flaws. The floor is an important part of any room. Nowadays, concrete floors can be found in various buildings, from garages, workshops in factories and hangars, to residential country houses and apartments.
Concrete has unique qualities fire and impact resistance, durability, water resistance, impermeability, it is also important that the cost of the material is relatively inexpensive. If you concrete the floor in a house or apartment, then an additional advantage will be the hygiene of the concrete. After all, a concrete floor is not a favorable environment for the reproduction and residence of harmful microbes and insects. Concrete flooring is universal for both residential and industrial premises. Non-professionals in this matter often ask a lot of questions like how to concrete a floor, what material is needed, etc.
Where to start concreting a floor on the ground
For cellars, garages and first floors country houses floors can be concreted directly onto the ground. In preparation for concreting, the question of how to properly carry out preliminary work before concreting will be tormented. The owner of the building can do this construction procedure on our own, even without having skills in this field of activity and without spending too much. Certain rules preparing the base for the floor:

- The first thing you should do is smooth the surface on which the floors will be placed in the future.
- The second is to compact the soil, using small stones or crushed stone. It is worth compacting every cm of soil thoroughly to prevent cracks from appearing in the future.
- During the third stage of surface preparation, a ball of sand with a thickness of 0.4 m to 1.1 m must be laid on a carefully compacted base.
- Then the sand cushion needs to be leveled and compacted evenly with a roller, pouring water on it.
It is worth noting that after the last procedure, the thickness of the sand ball will decrease by at least 26%.
Return to contents
How to waterproof and strengthen a concrete floor
The second question that a layman faces concerns how to make a concrete floor waterproof and resistant to stress.
The first thing worth considering in detail is the waterproofing of concrete floors:

- After compacting the sand cushion, you need to do waterproofing. The penetration of dampness and moisture into the building and the appearance of fungus, which poses a threat to human health, directly depend on the quality of this work.
- In order to protect a building from moisture, polymer or bituminous materials. To save money, you can also use thick plastic film.
- The selected materials for waterproofing are distributed over the entire surface of the floor. They are fastened together with construction tape. The slightest damage to the waterproofing should not be allowed. This covering should protrude 23-30 cm beyond the floor to protect against dampness between the floor and walls. Excess materials should be trimmed.
A man who is going to make a concrete floor on large area in a few days, you must know what formwork is. It is made from wooden boards at least 3 cm thick and placed around the entire perimeter of the building. With the help of formwork, you can divide the entire area of the room into sectors, which should be concreted separately.
Next you need to install a mesh to reinforce the floor. That is, it is necessary to secure the reinforcement for further concreting of the floors. Most often, floors are reinforced with reinforcement so that they do not collapse under heavy loads. When choosing reinforcement, it is worth considering the purpose of the building in which the floors are concreted. Most often, builders use reinforcement to strengthen floors, the diameter of which is at least 0.6 cm.
Return to contents
How to pour concrete floors

This paragraph will give a detailed answer to the most important question about how to concrete a floor. You can begin laying the concrete floor immediately after completing the work mentioned above. This process is carried out in stages:
- First layer of concrete. Need to do concrete mortar from cement brand M500 with the addition of granite chips. In order to make this layer of concrete more stable, you need to add a plasticizer.
- Then you need to lay out the solution on the prepared surface, while smoothing the concrete with a metal lath in accordance with the beacons.
- It is necessary to install beacons. We fill half the planned area with concrete and build a mound on top of it - this will be the lighthouse. Thanks to the beacon, you can easily level the concrete surface. Lighthouses should be erected no further than 1.5-2 m from each other.
- Before starting concreting, when leveling the surface, you need to set the guides at zero level. Then you need to put a vibrating screed on the guides. The concrete should lie above the guides by an average of 2.3-2.7 cm.
If you need to finish concreting the floor faster without damaging it, you can use vacuum concrete. To do this, after leveling the concrete, you need to put a filter agent on it.
An airtight mat is laid on top of it. Next, you should make a pipe in the middle of the mat and attach it to it Vacuum pump. It will quickly remove moisture without damaging the concrete coating. For concrete to completely harden using this method, it takes an average of 7-9 hours.
To create a durable and reliable floor, you need a base with an even greater level of strength and durability than the floor covering. The leaders in these parameters are concrete floors. A durable, smooth and dry concrete floor is an ideal base for any type of floor covering. In addition, concrete floors can withstand a large load on the surface, which allows them to be poured in rooms where it is planned to install heavy objects and equipment.
Concrete floors - pouring technology
Concrete is affordable and sufficient cheap material, it is easy to use and does not require special knowledge and skills. Thanks to these qualities, many people install concrete floors with their own hands when building country houses or renovating apartments. The main thing is to know how to properly pour a concrete floor so that it is strong and durable. Therefore, before pouring a concrete floor, you need to familiarize yourself with the technology of pouring a concrete floor, acquire the necessary tools and carry out preparatory work, after which you can safely begin pouring the concrete floor. All work can be done independently, but to increase speed and conserve strength, you will need a partner who will do his part of the work.
Pouring a concrete floor is divided into several stages:
- preparation of the base;
- concrete floor insulation;
- reinforcement;
- arrangement of formwork;
- preparing the concrete mixture and pouring it;
- leveling the surface and screeding the concrete floor.
Preparing the base
To pour a concrete floor it is necessary to perform a series of preliminary work. First of all, this will concern the base. If the floor will be flooded in the apartment, then it is necessary to remove the old flooring and rip off the old one concrete screed up to the ceiling. Usually the thickness of the concrete floor is about 5 cm, and to remove it you will have to use a hammer drill. Having removed the old floor to the ceiling, we clean the surface of dirt and proceed to the next stage.
Important! If the screed has no obvious damage, cracks or breaks, then you can leave it and begin leveling the surface itself for a new floor covering.
In private houses, everything is somewhat more complicated. The fact is that the concrete floor of the first floor of a private house is often made on the ground, and will require additional labor costs.
Layout of a concrete floor on the ground
To prepare the base you need to do the following:
1. Place a mark at a level of 1 m from the base of the doorway and, using a level, transfer it to the walls along the entire perimeter of the room.
2. We measure 1 m down from the received marks; these marks will represent the level (“zero”) to which it is necessary to pour concrete.
3. To clearly see the “zero”, we hammer in nails according to the marks and pull the cord.
4. In the room where we will make the floor, remove about 25 cm of soil.
5. Level the surface horizontally and compact it; for this you can use a log with a board nailed to it or a special vibrating plate.
6. Pour a 5 cm layer of gravel onto the resulting surface, thoroughly water it and compact it.
7. Pour 10 cm of sand on top of the gravel, also water and compact the sand.

Checking the surface horizon with a level
Important! At the stage of preparing the base, it is necessary to constantly ensure that the base is horizontal along the plane using a level. If the project provides for communications that are hidden under the floor, then they must be laid simultaneously with the filling of sand, having previously been hidden in special boxes.
8. Pour about a 10 cm layer of crushed stone on top of the sand, compact it and sprinkle it with sand to get a relatively flat surface.
Important! The size of the stone in crushed stone should be 45-50 mm. To maintain the filling level of all layers on the walls, you can put marks for each of them. It should also be noted that the thickness of the concrete floor itself must be at least 2 cm.
Concrete floor insulation

Waterproofing concrete floor with film
The installation of concrete floors on the ground requires high-quality waterproofing. If this is not done, there will be constant dampness in the premises, which will negatively affect interior decoration, interior items and the microclimate of the room as a whole. For this you can use a simple polyethylene film 200 microns thick, waterproofing membranes or any other type of waterproofing roll materials. It should be noted that for high-quality waterproofing, the film will need to be laid in several layers, while other waterproofing materials can be laid in one layer. We lay both the film and the rolled waterproofing materials with an overlap of about 20 cm and fasten them with adhesive tape. We bring the edges onto the walls with an overlap, so that they reach the zero mark, and glue them with adhesive tape to the surface of the walls.
In addition to waterproofing, the concrete floor should also be thermally insulated. Depending on the design of the concrete floor, the following thermal insulation materials can be used, which must be laid at a certain stage of the work:
- expanded clay;
- Styrofoam;
- stone basalt wool;
- mineral wool;
- expanded polystyrene;
- extruded polystyrene foam;
- polyurethane foam;
- perlite;
- chipboards (chipboards);
- thick moisture-resistant plywood;
- cork covering;
- rolled isolon;
- insulated linoleum or carpeting.
Reinforcement

Reinforcement of concrete floor with metal mesh
Reinforcement is performed when the concrete floor will bear increased loads. For reinforcement use metal or plastic mesh. You can make such a sect yourself by welding it from metal wire with a thickness of 3 mm to 5 mm. The mesh itself is placed on stands 2-3 cm high so that after pouring it becomes a single whole. If a soft reinforcing mesh is used, then to lay it, pins are driven in, onto which the mesh itself is subsequently pulled. Another material for reinforcing concrete floors is reinforcing bars thickness from 8 mm to 15 mm, which are welded together into a single mesh.
Arrangement of formwork
To facilitate the pouring of concrete floors, formwork is installed in large and medium-sized rooms. To do this, the room is conventionally divided into equal rectangles (“maps”). The size must be chosen such that the “card” can be filled in one, maximum two passes.

The guides for the formwork are fixed with cement mortar
For the formwork itself you can use regular boards or moisture-resistant plywood. Now you need to lay the guides. They divide the room for “maps”, and their height will correspond to the “zero” level to which the concrete will be poured. Can be used as guides metal pipe, wooden block or board. We lay the guide itself on the prepared base and fix it with thick cement mortar.
We install the formwork between the guides and finally form the “maps”. Before making the concrete floor perfectly flat and smooth, we align the guides and formwork to “zero” along the horizon using a level.
Important! In order to be able to remove the formwork and guides from the poured concrete, they are lubricated with special formwork oil. Thanks to this, you can quite easily separate the guides and formwork from the concrete.
Preparing the concrete mixture and pouring it
To ensure a strong and durable concrete floor, it should be poured in one go. Therefore, if you have a financial opportunity, you should order a ready-made concrete mixture at the factory. It will be delivered in a concrete mixer and in large quantities at once. You don't have to waste time and effort on self-cooking solution.
If finances do not allow, then you can do everything yourself. To do this you will need an electric concrete mixer, cement, sand and crushed stone. Cement should be chosen grade M500 or M400, since the strength of concrete directly depends on this. As for sand, it should be river sand, without impurities and clay.
To prepare concrete, you need to take 1 part cement, 2 parts sand, 4 parts crushed stone and 0.5 parts water. We thoroughly mix the concrete in a concrete mixer and pour it into the “card”. We level it with a shovel, make vertical piercing movements and stretch it over the entire area. In this simple way, the concrete is gradually compacted and air comes out of it. For better shrinkage, you should use a special vibrator. The vibrations it creates shrink the concrete solution, compacting it, thereby allowing the concrete to penetrate into all cracks and voids.
As soon as concrete milk appears on the surface, you can stop shrinking and move on to another card, into which your partner has poured fresh solution.
Important! Concrete should be poured starting from the corner opposite the door and moving towards the door.
Leveling the surface and screeding a concrete floor

Leveling the surface of a concrete floor using the rule
Once several "cards" are filled with concrete, leveling of part of the concrete floor can be done. To do this, we use a rule more than 1 m long. We install the rule on the guides and pull it towards us. Thus, excess concrete ends up in the still unfilled “cards”, and the floor level goes to “zero”. Then we remove the formwork in the leveled areas, fill the voids and continue pouring.
After completing the pouring, the concrete is allowed to stand for 3-4 days. Every day we moisten it with a small amount of water so that it reaches gradually and does not begin to crack. Then cover plastic film and leave until completely hardened for 3-4 weeks, wetting it from time to time.
After hardening, a layer of screed is applied to the concrete floor:
1. To do this, apply a layer of liquid cement mortar or with the addition of various binders to the floor.
2. We start making the screed itself from the corner and move towards the door.
3. Upon completion, let the screed sit for 2-3 days, moistening it with water every day.
Now that the screed has hardened, you can begin.
Installing concrete floors is a long and painstaking process that cannot be rushed. To create a truly high-quality and durable concrete floor, it is necessary to follow the technology for laying it, otherwise you will have to break the entire thickness of concrete with a hammer drill and pour it again. But, despite all the shortcomings and labor-intensive installation, concrete floors remain the easiest to install and unpretentious to use.
Concreting the floor in a home is a responsible process. It requires a competent approach and adherence to technology. Only then can you be sure that it will complete successfully.
It is necessary to start concreting the floor in those places that are located as far as possible from the passage or door.
When starting to concrete the floor with your own hands, you should prepare a kit in advance necessary tools, as well as building materials.
What will be required to carry out the work?

For concreting the floor, you will need tools and materials such as: a shovel, a trough, a crowbar, bars, chalk, crushed stone, gravel, sand, alabaster and others.
In order to fill the floor in your home, you will need the following:
- shovel;
- trough;
- grater;
- rule;
- crushed stone;
- sand;
- heat and waterproofing;
- plasticizers;
- vibrating plate;
- gravel;
- cement;
- bars;
- alabaster or plaster.
Having prepared all these materials and tools, it will be possible to complete all the work not only efficiently, but also quickly. Accordingly, you can start finishing the finished floor as soon as possible.
Preparatory stage

First, you will need to prepare the floor in the house. If the home is new, then you just need to clean the base from construction waste. If the house has been put into operation several years or even decades ago, then you need to remove the baseboards using a crowbar and dismantle the old floor coverings.
Secondly, you will need to measure the distance from the place where the baseboards are attached to the bottom of the floor. It is necessary that it be at around 30-35 cm. If the distance is less, then you will need to deepen the floor by the required amount. This is done by dismantling the lower part of the base or removing the first layer of soil (if the dwelling has just been built).
Thirdly, you need to take into account that the concrete floor in the house will consist of several layers. It is important to make preliminary markings for each. Then the finished base will be perfect. Along the perimeter of the room, using chalk, you need to make the lowest mark at the level of 10 cm. This will allow you to correctly lay the crushed stone layer. A mark is placed above at a level of 5 cm. It is along this mark that you will then need to fill in a layer of sand. Next, two more marks of 5 cm are made, which are necessary for the correct layout of heat and waterproofing material. And the last highest mark should be 10 cm. This thickness will be the concrete layer.

The reinforcement grid must be located at the bottom of the slab, at a depth of a third of its thickness.
After this, you can proceed directly to filling the crushed stone along the mark made. It is important to level it after this. Then you can fill in the sand and compact it. This is done using a vibrating plate. However, if you do not have such a device in your arsenal, then you should make your own. To do this, take a 150*150 beam and attach a handle to it on top. From below you will need to fix another beam vertically. Compact the sand with the finished device, and then proceed to waterproofing. To do this, you can take material based on bitumen or polyethylene (minimum 200 microns). It must be laid out with an overlap to ensure high-quality waterproofing. The top is similarly lined thermal insulation material. It is recommended to give preference to quality in order to minimize the cost of heating the house.
Then you need to install beacons. They allow you to fill as smoothly as possible. They need to be made from bars. They are placed on a prepared base in such a way that they form on the plane of a cell more than a meter in size. To install them correctly, you should use a water level. Then you need to additionally fix the beacons using alabaster or plaster.
Preparation of the solution
In order for your home to live up to expectations, you need to approach the preparation of the solution with special responsibility. You need to take 1 part of cement (for concreting it is better to use M400), 2 parts of construction sand and 2 parts of gravel. All these components must be combined together and mixed. This needs to be done as best as possible; it is important to obtain a mass that is uniform in color. Then 0.5 part of water is added to it, after which everything is thoroughly mixed again with a shovel. It would be great if plasticizers were added to such a solution. They will provide the cement with fluidity and plasticity. Plasticizers must be added to the solution according to the instructions given on their label.
Laying the concrete layer

The solution is first laid out in cells, and then distributed over the base using the rule.
Now you can proceed directly to pouring the floor. You need to start doing it from the far corner of the room, and then gradually move towards the exit. you need to lay it out in cells, and then using the rule you need to distribute it over the base to get a flat surface without any voids or defects. If there are any unevenness, they can be smoothed out with a grater. Then the concrete solution is laid out in order in the remaining cells.
After this, the resulting screed should be left for two days. Then you need to remove the beacons. Next, the finishing base is created. It should have a small layer (0.7-1.2 cm). It needs to be created from more liquid solution. This means that 0.7 part water is added to 1 part cement, 2 parts building sand and 2 parts gravel. Ready mix poured onto the concrete screed and carefully leveled. After this, the floor in a private house is left for 7 days.
Surface grinding
To ensure that the finished concrete base has an ideal surface, experts recommend grinding it. This is done first using a machine with a disc whose grain size is no more than 30. It is necessary to carefully treat the entire surface of the created floor. After this, it is additionally sanded with a machine with a disc whose grain size is within 40. This is done for no more than 15-20 minutes. And at the last stage, the base is polished with a tool with discs with a grain size of up to 1500. Upon completion of this work, the floor will become perfectly smooth and even acquire a glossy shine. You can lay any floor covering on it - linoleum, parquet, ceramic tiles, a cork or something else. Choose it according to what your future will be like. a private house interior. So, for example, if it is decorated in a classic or modern style, then parquet is suitable, and if in the Baroque or Art Nouveau style, then tiles with monograms and patterns would be appropriate.
By concreting the floor according to the recommendations given, you will be able to create a high-quality foundation in your private home. It will be characterized by high performance and technical characteristics. Consequently, the floor will last a long time.


